
Are you ready to explore the exciting world of Photoshop Elements on the web? There are some brand-new features of the Elements web companion in the Adobe Element Web Companion. From creating stunning text-based designs to experimenting with overlays, there’s something for every creative soul. Join us as we dive into the practical side of… [Continue reading]
Navigating the Quick, Guided and Advanced Workspaces in Photoshop Elements 2024

Diving into Adobe Photoshop Elements 2024, there’s so much to unpack. If you’re like me and love playing around with photos, you’re going to want to stick around. When you first open Photoshop Elements 2024, you’re greeted by a welcome screen. You’ve got three options: the Organizer, the Photo Editor, and the Video Editor. Already,… [Continue reading]
How to Unzip Your Digital Scrapbook Supplies

How to unzip your digital scrapbook supplies on Windows 11 [Continue reading]
Don’t Stretch Your Photos

Learn how to resize your photos, embellishments and text perfectly every time in Photoshop Elements. [Continue reading]
Create a Perfect Portrait in Photoshop Elements 2023

You can create the perfect shot, with facial feature adjustments in Photoshop Elements. Automatically open closed eyes, fine-tune face tilt and automatically smooth skin. [Continue reading]
How to Create a Quote Graphic in Photoshop Elements 2021

There’s a new addition to the Create button. It’s a new type of creation that helps you add text, shape, graphics and animation to an image. Adobe has created some templates to help you get a great result. You can create a Quote Graphic from Organizer or the Editor in Photoshop Elements 2021 or newer.… [Continue reading]
How to Use the Warp Tool

Learn to warp shadows and more with the warp tool! [Continue reading]
Create A Reel in Photoshop Elements 2024

Zip through your favorite shots, each with its own text, effects, and graphics. Now, with new Photo Reels, you can save them as MP4s or GIFs for easy sharing on all your favorite social platforms, such as Instagram, Facebook or TikTok. [Continue reading]
How to Adjust Face Tilt in Photoshop Elements
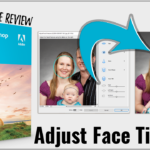
If you have a photo where people are not quite looking at the camera, you’ll love this new feature. Watch to see how easily you can adjust faces in Photoshop Elements 2021 and newer. How to Adjust Face Tilt You can adjust the angle and rotation of faces inside the Adjust Facial Features dialog box.… [Continue reading]
How to Get Started Digital Scrapbooking

Here’s all the help you need to Get Started Digital Scrapbooking! [Continue reading]
- 1
- 2
- 3
- …
- 21
- Next Page »